Keeping warm with odds and ends

handknit  hoodie

You may remember I have already knitted a hoodie like this out of leftover  and unravelled yarn but I gave that to Miranda so I needed another one.  And this one only took me 2 months to make, which is a record for me!

handknit hoodie

Whilst this one is not made of unravelled yarn, I didn’t buy any new stuff because it’s made completely of other people’s leftovers.  Quite a few balls had been given to us of various colours and thicknesses, and I spent a couple of pounds at charity shops buying a mixture of odd balls, so it has cost me next to nothing and I’ve made something useful out of stuff that was being thrown out.  Win-win 😀

handknit hoodie

Ooh, it’s so lovely and warm 😀

Here is the pattern if you’re interested, although it’s rather messed up so I don’t know if you’ll be able to make sense of it.

knitting pattern

knitting pattern

knitting pattern

I made mine really chunky by using 3 strands of DK (or whatever I had) so it came out bigger than the one on the pattern.  Plus I made mine longer.  So, with a pack-a-mac over the top on rainy days, I’ve got a homemade winter coat 🙂

The pattern came from this book  Greetings from Knit Cafe by Suzan Mischer

A Good Book and some Upcycling

Unqualified Education

When we began our home schooling adventure all those years ago we were very lucky to find this wonderful book.  Unqualified Education is full of inspiring ideas and information, advice and encouragement.  It is an absolute joy and still a great resource after the children have grown up.

contents

We decided to home school when my eldest daughter was just 12 and my youngest was 9.  It was not because they were bullied or anything, and they were not struggling with any of the work.  It was just that life is short, and childhood so short that they should be able to enjoy it all.  In school they were forced to conform to the ‘norm’, to study a set curriculum.  It was so rigid.  My eldest was so stressed.  She got detention for wearing the wrong colour socks for PE; her friend who had cut his hair into a mohican, and had assured his teacher that he would wear it flat and combed tidily for school, was told “Absolutely not!  Shave it all off!”  They simply weren’t allowed to be individuals.

At home we were free.  They could study what they wanted, how they wanted.  We went bike riding and swimming.  We grew vegetables and cooked and sewed and painted and, yes we did maths and English, but we read and read and read – really good books.  We did history and learnt Welsh (a bit).  What I knew I taught them; what I didn’t know we learnt together.  It was the best time.

This book was a wonderful support and inspiration.  Mind you, it’s a good book for anyone, whether home schooling or not.  As you can see from the Contents page, there’s a lot in there, and the recipes in the cooking section are all vegetarian and nearly all vegan!  There is the most amazing chocolate chip cookie recipe – mm mmmmm!

****

Anyway, I needed a new apron so I got out the book, looked up the apron pattern and upcycled myself one:

how to make an apron

(You can click on the pics to enlarge them by the way)

first

first pic

I didn’t have a broadsheet newspaper but luckily Miranda had an old pad of flip-chart paper which she’d rescued from the bin at work and that was just right for this job.

second

second pic

I upcycled an old duvet cover – thoroughly washed of course!  I didn’t do the little pocket because I wanted a big pocket – read on 🙂

cut out

third

fold, pin and hem

You can sew it by hand, it just takes a while.  Luckily I had use of a sewing machine – thanks Mum 🙂

After the hemming was done I attached the ties as shown in the instructions.

vintage tea towel

I decided to make a pocket out of this gorgeous vintage tea towel found in a charity shop.  I cut off the bottom row of dogs and hemmed the raw edge.

fold and hem top edge of pocket

Then I put on the apron so that I could position the pocket and put in a pin to mark the position of the centre of the top of the pocket.

put on apron and mark with pin where centre top of pocket will be

Then I sewed it on.  With a pocket this size you have to sew up the middle, effectively creating two pockets.  No dogs were harmed by this procedure – I was very careful not to sew over any of them 🙂

All done!

finished

finished apron

Remember I wanted a new hat?

recycling hats

Remember I wanted to make a new hat

With the yarn from old hats I’d unravelled?

Remember I said Random Rose made a hat,

beret with ridges she cabled?

****

Well I followed the pattern that Rose kindly shared,

Though the yarn had lost elasticity.

The needles I used were not quite the right size,

But I wasn’t going to let that stop me.

****

So I finished my hat and I’m pleased how it went,

Cream and purple go well together.

I admit it turned out bigger than it was meant,

For my head is decidedly smaller.

****

As luck would have it, Miranda’s got a big head,

Though not the metaphorical kind.

So I decided to give it to her instead,

And I honestly really don’t mind.

recycled beret finished

recycled beret side

recycled beret back

Miranda's new beret

I want a new hat!

sloppy cream hat

I want a new hat,

It’s as simple as that!

But I’ve got no money to buy one.

I know what I’ll do,

I’ve got old hats – two,

I’ll unravel to make a new one.

saggy purple hat

Rose shared a pattern,

A cool beret pattern,

Which I’ll use to make my new hat.

The purple from my sloppy

And the cream from my saggy

Hats will go great together for that!

yarn to reuse

Recycle an old shirt or two

Here’s an idea I got from this book:  Sewing Green Click on the pic find it on Amazon

At least, I think I got it from this one but I gave it away a while ago so I’m not 100% sure.  Anyway, if you’ve got a couple of old shirts – preferably big men’s ones – lying around with nothing to do, why not cut them up and make a new apron?  My husband decided these just weren’t him any more.  Excellent! 😉

1 old shirts

So, you’ve got your hands on a couple of old shirts that nobody wants – actually you could do this with one shirt but it’s nice to have contrasting patterns and colours to work with.

2 cut the back out

Cut out the back of the shirt which is going to be the main piece of your apron.  If, like me, you don’t want to be bothered with hemming or edging, cut outside the seam (as shown here) and then your edge is already hemmed.  Cut up to the arm pit on both sides of the back and then straight across.

3 back

It should look something like this.

4 collar waist band

Cut off the collar of the other shirt (or the same one if you prefer) – this is going to be your apron’s waistband.  You only want the bit that would go around the neck, not the triangle-ish bit.  Again cut outside the stitching so that you don’t need to edge it yourself.

5 unpick collar

Then you need to unpick the bottom edge of the collar …

6 pin collar on

… so that you can slightly gather the top of your apron and fit it inside the collar (now waistband).  Pin it in place.

7 sew waist band on

Sew on the waistband.  I like zigzag but you could easily do this by hand.

8 cut out letters

Now for your design.  You could cut out the breast pocket from one of the shirts and attach it to your apron.  I think that’s what the book tells you to do and it does look lovely but I thought “I don’t need a pocket on my apron” so I decided not to.  You could do anything you like … or nothing at all 🙂 I went with lettering.

Cut your design out of the contrasting material ….

9 pin them in place

… and pin it to your apron.

10 sew the letters on

Sew it in place.

Nearly there.  Now you just need ties.

11 ties

I used the shirt button bands for the simplicity.  They’re already stitched and you can attach them to the collar/waistband with buttons!

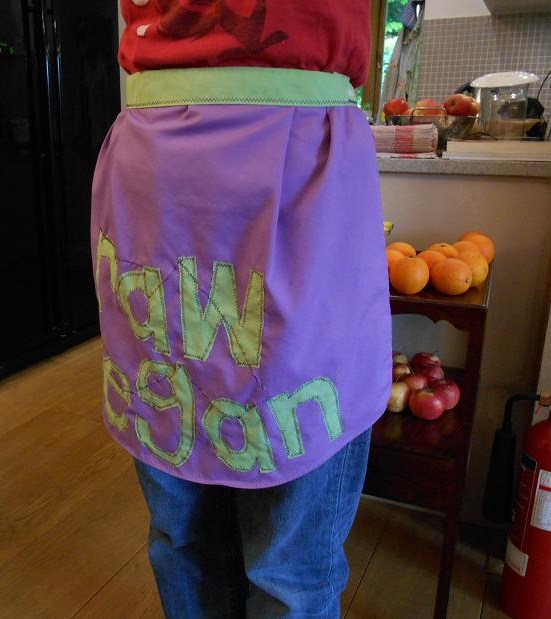
12 finished apron

13 button band ties

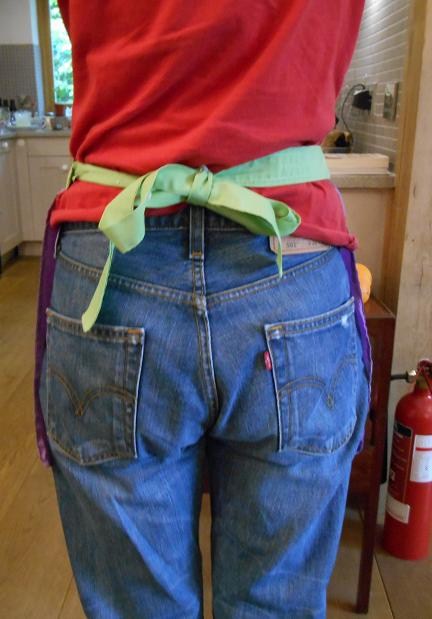
14 back view

15 front

16 hanging apron

Re-Knitting

knitting

Knitting is a very enjoyable hobby as well as being a very useful skill.  To be able to make your own clothes, toys and accessories is a brilliant way of being self-reliant and can also be eco-friendly.

As a vegan shopper you won’t want to buy wool or alpaca or silk, but as an eco-minded shopper you won’t want to buy acrylic.  The problem is that organic, eco-friendly, natural yarns are very expensive.

So what do you do if you can’t afford the eco-stuff?  Simple – you Re-Knit!

Browsing in charity shops and second hand shops you’re bound to find knitwear that is a pretty colour, but unattractive design.  If you buy it, wash it and unravel it, you can re-knit that colour into something beautiful.  It’s just another way to recycle, or upcycle if you like, and it’s very enjoyable and satisfying.  Here are a few things we made with unravelled yarn and oddments:

This matching hat and mittens was made by acrylic yarn unravelled from 2 different machine-knit jumpers. The problem with unravelling machine-knits is that the yarn is cut at the end of each row, it's not continuous like with hand-knits. So the ends of the yarn had to knotted together as each row was unravelled. Quite tedious and time-consuming but it results in interesting balls of yarn which, when knitted together, produce a unique effect. Leaving the dangling ends of each knot untrimmed creates a shabby chic effect .

This matching hat and mittens was made with acrylic yarn unravelled from 2 different machine-knit jumpers. The problem with unravelling mass-produced machine-knits is that the yarn is cut at the end of each row, it’s not continuous like with hand-knits. So the ends of the yarn had to knotted together as each row was unravelled. Quite tedious and time-consuming but it results in interesting balls of yarn which, when knitted together, produce a unique effect. Leaving the dangling ends of each knot untrimmed creates a shabby chic effect .


Blanket made by sewing together little knitted squares

Blanket made by sewing together little knitted squares


The yarn from these saggy old hats was unravelled and knitted into ...

The yarn from these saggy old hats was unravelled and knitted into …

... this gorgeous beret

… this gorgeous beret

An enjoyable way to give new life to old knitwear and keep it out of landfill 🙂

Don’t know how to knit?  No problem – watch this brilliant video:

And for the left-handed:

UPDATE:

I’ve just finished the hoodie I was knitting in the photo at the top.  I wanted a warm chunky knit but didn’t have any thick yarn so this is knitted with 3 strands of unravelled DK acrylic; lots of different colours and oddments.  It’s so soft and warm, like wrapping yourself in a blanket before you go outside.  Now I’ve just got to find a zip for it 🙂

upcycled knitting yarns

upcycled knitting yarns

upcycled knitting yarns

Further update:

I’ve just finished another one here and if you would like to make one yourself, the pattern is at the bottom of this post 🙂