Make a bus like the Andersons’ Old Red

cardboard bus

Take a look at Old Red in The English Family Anderson and have a go at making a model bus just like it 🙂

You’ll need:

some cardboard, a pencil, a rubber, a pen, some paint, some scissors, a ruler and some sticky tape.

some cardboard, a pencil, a rubber, a pen, some paint, some scissors, a ruler and some sticky tape.

measuring it out

First measure out the shape of the bus.  Using a cereal box made it easy because I could use the side as the roof (so it already had neat folds).  The front needs to be the same width as the roof; make the length at least twice the width of the bus.  Mine came out a bit short but you can make yours as long as you’ve got room for on your cardboard.

Once you’ve got the two sides, roof and front measured out you can draw in the details.  My bus is open at the back because I want to be able to furnish the inside later, but if you’ve got a long enough piece of card you can draw a back too (see the video at the bottom for how it should all be laid out).

front

windows

windows and door

When you’ve got it all mapped out, go over all the good lines in pen.

pen

Then rub out all the untidy planning lines you don’t want anymore.

rub out pencil lines

Then paint it 🙂

paint

When it’s dry, cut it out:

cut it out

Now you’ve just got to fold it and stick it.  If you’ve used a box like I have, you should already have good tidy creases between the sides and roof, but you’ll need to score a neat crease where the front folds to meet the other side.  Carefully place a ruler on the wrong side (inside) of the bus, along the line where you want to fold it, and score a line with your scissors.

score

NB: If you want to furnish the inside of the bus then take a look at this before you stick it together.  Then put a piece of tape on the top and side edge of the front of the bus (again on the wrong side)

tape

Then you can fold it and stick it to the top and other side of the bus.

It’s a bit fiddly but you’ll get there 🙂

And there you have it!

cardboard bus

model 2

model 3

I got this idea from Dylan Bryan.

Watch him do it (especially look out for his mum interrupting) I love this video* 🙂

* sadly, Dylan’s video is now deleted from youtube 😦

If you want to furnish your bus, go to Part 2 🙂

Feeling Crafty?

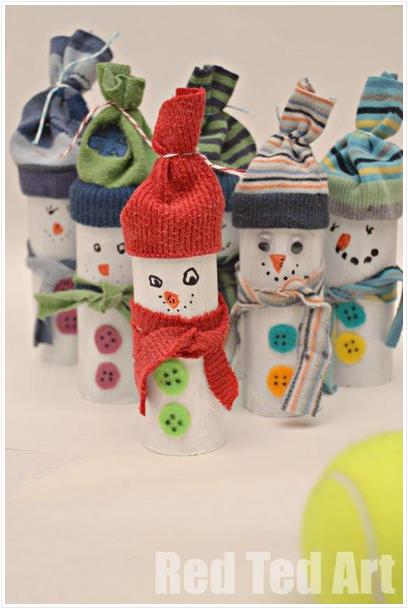
loo roll snowmen

How about making a snowman?

At Red Ted Art they’ll show you how to make lots of cute snowmen out of toilet rolls and old socks and then you can play skittles with them!

And you don’t need to use plastic goggly eyes or felt – you can draw on the eyes and buttons or stick on some actual buttons that you’ve got lying around at home.

And don’t worry if you haven’t got any toilet rolls saved – make the cardboard rolls out of whatever you’ve got – cereal boxes for example.

And here’s how to make your own glue

Keep it vegan and recycled and you can’t got wrong!

Have fun 😀

Re-Knitting

knitting

Knitting is a very enjoyable hobby as well as being a very useful skill.  To be able to make your own clothes, toys and accessories is a brilliant way of being self-reliant and can also be eco-friendly.

As a vegan shopper you won’t want to buy wool or alpaca or silk, but as an eco-minded shopper you won’t want to buy acrylic.  The problem is that organic, eco-friendly, natural yarns are very expensive.

So what do you do if you can’t afford the eco-stuff?  Simple – you Re-Knit!

Browsing in charity shops and second hand shops you’re bound to find knitwear that is a pretty colour, but unattractive design.  If you buy it, wash it and unravel it, you can re-knit that colour into something beautiful.  It’s just another way to recycle, or upcycle if you like, and it’s very enjoyable and satisfying.  Here are a few things we made with unravelled yarn and oddments:

This matching hat and mittens was made by acrylic yarn unravelled from 2 different machine-knit jumpers. The problem with unravelling machine-knits is that the yarn is cut at the end of each row, it's not continuous like with hand-knits. So the ends of the yarn had to knotted together as each row was unravelled. Quite tedious and time-consuming but it results in interesting balls of yarn which, when knitted together, produce a unique effect. Leaving the dangling ends of each knot untrimmed creates a shabby chic effect .

This matching hat and mittens was made with acrylic yarn unravelled from 2 different machine-knit jumpers. The problem with unravelling mass-produced machine-knits is that the yarn is cut at the end of each row, it’s not continuous like with hand-knits. So the ends of the yarn had to knotted together as each row was unravelled. Quite tedious and time-consuming but it results in interesting balls of yarn which, when knitted together, produce a unique effect. Leaving the dangling ends of each knot untrimmed creates a shabby chic effect .


Blanket made by sewing together little knitted squares

Blanket made by sewing together little knitted squares


The yarn from these saggy old hats was unravelled and knitted into ...

The yarn from these saggy old hats was unravelled and knitted into …

... this gorgeous beret

… this gorgeous beret

An enjoyable way to give new life to old knitwear and keep it out of landfill 🙂

Don’t know how to knit?  No problem – watch this brilliant video:

And for the left-handed:

UPDATE:

I’ve just finished the hoodie I was knitting in the photo at the top.  I wanted a warm chunky knit but didn’t have any thick yarn so this is knitted with 3 strands of unravelled DK acrylic; lots of different colours and oddments.  It’s so soft and warm, like wrapping yourself in a blanket before you go outside.  Now I’ve just got to find a zip for it 🙂

upcycled knitting yarns

upcycled knitting yarns

upcycled knitting yarns

Further update:

I’ve just finished another one here and if you would like to make one yourself, the pattern is at the bottom of this post 🙂